How can you keep your little artists busy without turning the living room into a battlefield? 🎨 Finding easy creative activities for children aged 3 to 6 often calls for a kind of organisation that slips away between two loads of laundry. This guide gathers simple ideas like finger painting and homemade modelling dough to build fine motor skills without the stress. You’ll discover how to turn recycled cardboard boxes into space rockets and set up a self-serve craft corner for calm, inspired afternoons.
- The essential supplies and setting up the craft corner
- Building fine motor skills and sensory awareness
- Simple painting techniques for endless fun
- Giving everyday objects a second life
- Celebrating the seasons and holidays as a family
- Quick activities and tips to encourage independence
🧰 The essential supplies and setting up the craft corner
Now that we understand why creative hobbies matter, let’s look at how to set the stage properly for your little artists.
✅ The basics to always keep within reach
To get started, go for a solvent-free glue stick and round-tipped scissors. Thick drawing paper holds up to every whim. These safe tools let children take their first calm, confident steps into creating.
Paint is a must-have for easy creative activities with children aged 3 to 6. Choose liquid gouache or finger paint. It’s best to pick water-washable products to make life easier once the session is over.
Stop throwing away your old boxes and paper rolls. These free items quickly turn into rockets or animals. They offer endless building possibilities without spending a penny.
- Solvent-free glue
- Ergonomic scissors
- Coloured sheets
- Old newspapers
🪑 Setting up a practical, inspiring creative space
Set aside a little dedicated corner in the living room or bedroom. Your child should be able to recognise this exact spot as their personal laboratory. This is where imagination comes to life in complete freedom.
Use clear bins placed on low shelves. This setup encourages independence, since the child can help themselves. They no longer need to ask for help to reach their felt-tip pens.
The table should be set at the right height. Good posture prevents needless tiredness. It also encourages longer focus on whatever craft or modelling project is under way.
Add a display area on a wall for the finished pieces. This celebrates the work accomplished by your little artist. Plus, it cheerfully decorates the room with their very own creations.
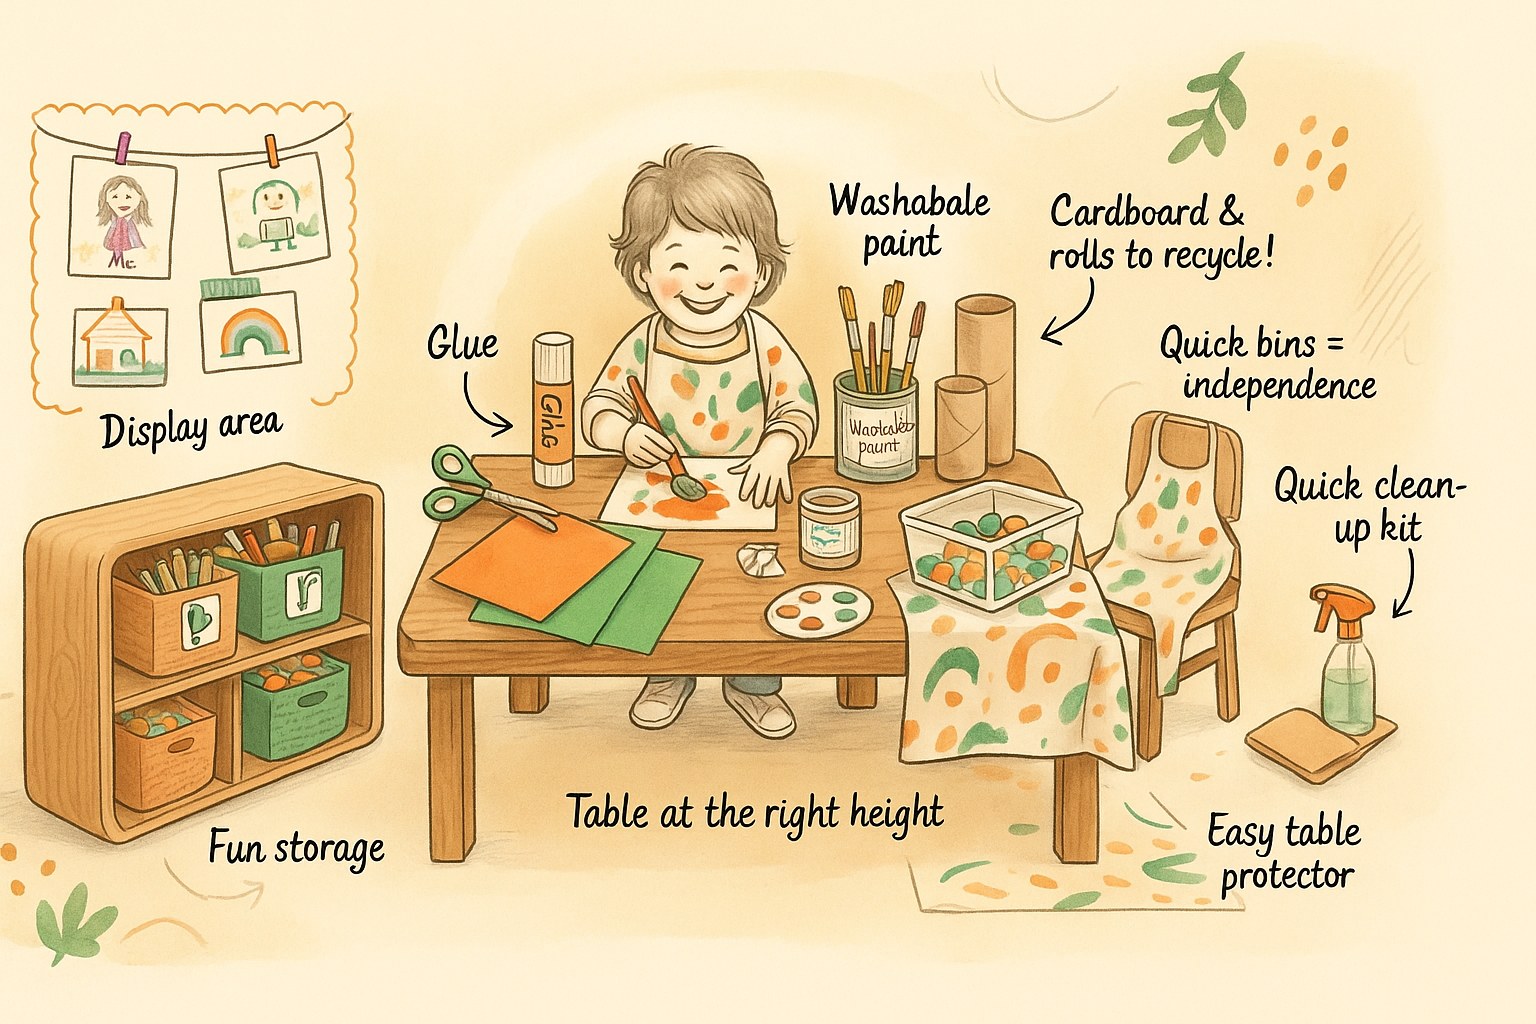
🧹 Tips to limit mess and clean-up
Always protect your table with an oilcloth cover. A large plastic tray also keeps paint spills in check. It’s a simple barrier against glue and felt-tip stains.
Keep a clean-up kit right next to the craft area. An old adult T-shirt makes the perfect apron. It protects clothes from splashes of gouache or acrylic paint during all the handling.
Set up a playful tidy-up ritual at the end of each session. Learning to sort the brushes and put the caps back on the pens is part of the activity. It becomes a game rather than a chore.
Keep wipes or a damp sponge handy. That way you avoid colourful fingerprints on white walls. A quick wipe is often enough to save your furniture.
🤲 Building fine motor skills and sensory awareness
Once the craft corner is ready, let’s focus on the activities that strengthen little fingers while waking up the senses.
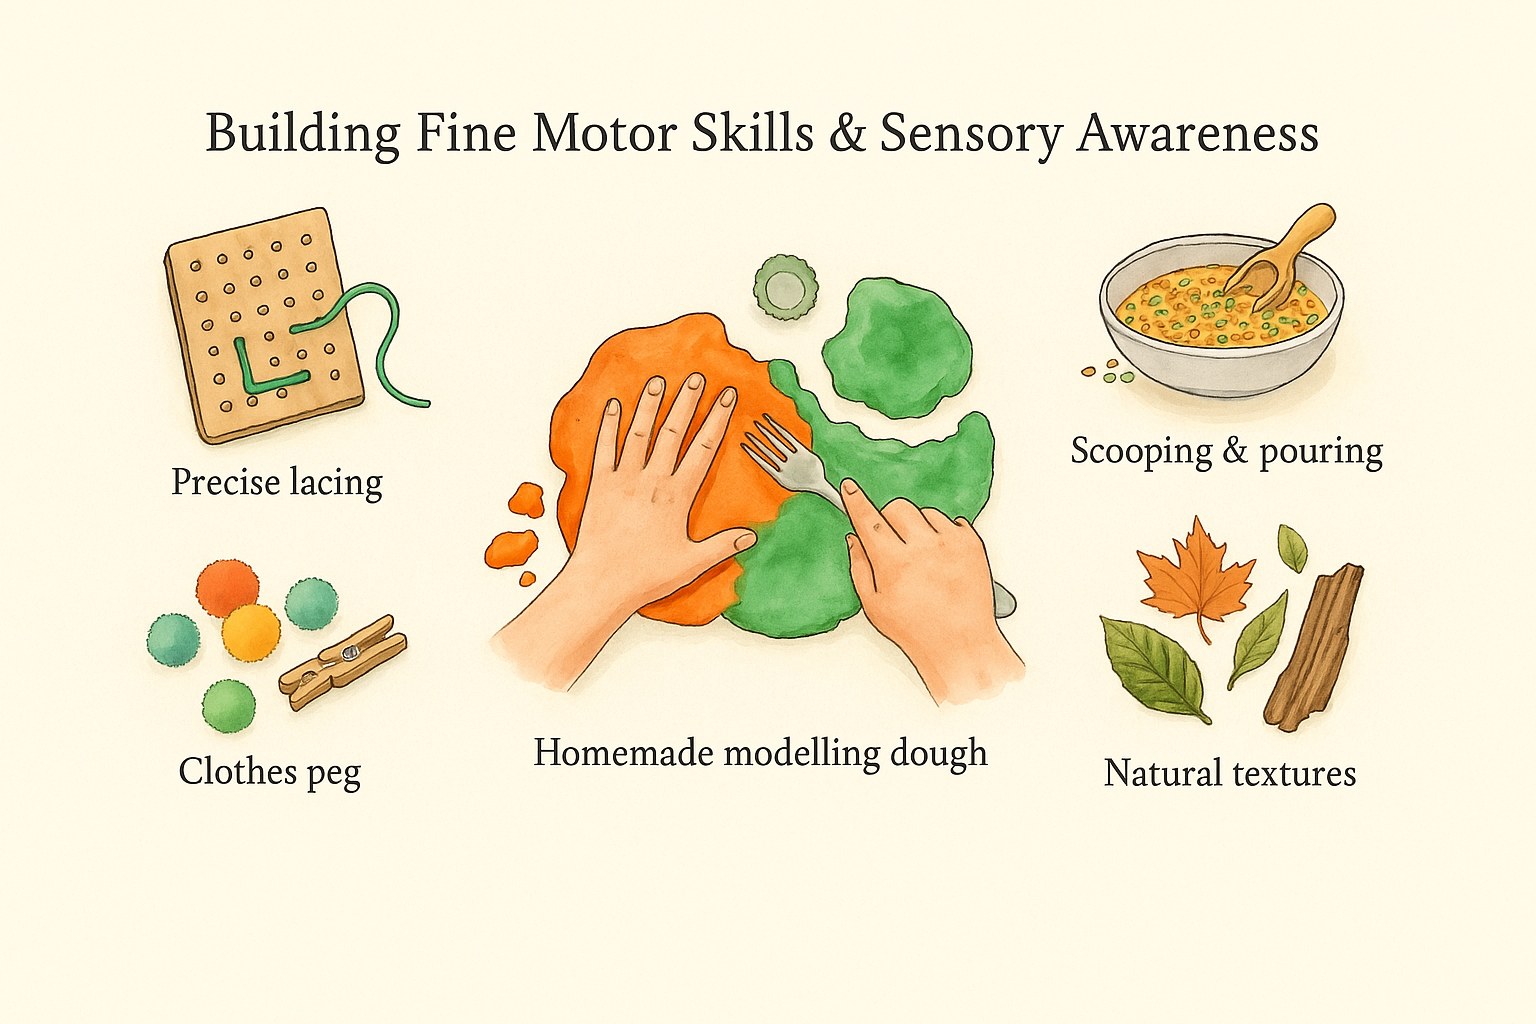
🎨 Homemade modelling and salt dough
Make an edible modelling dough with flour and salt. Add food colouring for extra variety. It’s a cheap, safe option. The colours actually deepen as the dough cools.
Salt dough lets you create lasting objects after baking. It’s perfect for making little gifts or figurines. Children love watching their work harden so they can keep it for a long time.
Offer a range of tools, like forks or bottle caps. These accessories press original prints into the dough. You can also use cookie cutters to vary the shapes.
Modelling is a key step in strengthening the muscles of the hand before learning to write.
✋ Handling games to build up the fingers
Prepare punched cards for lacing exercises. Threading a lace through the holes takes great visual precision. It’s a patience challenge that little ones rise to with pride.
Use clothes pegs to pick up pom-poms. This pincer grip is crucial for holding a pen later on. You can also offer kitchen tongs to fish out objects.
Pouring seeds or coloured sand is great fun. It’s an excellent lesson in measuring and patience. Handling funnels or sieves helps children grasp volumes.
Keep in mind that creative discovery supports overall thinking skills in a broad, lasting way.
🧊 Discovering textures and volumes
Make tactile collages with cotton wool and crepe paper. Mixing soft and rough materials sparks sensory curiosity. It’s a direct exploration of the world around the child.
Try creating simple three-dimensional shapes. Turning a ball of paper into an animal helps build a sense of space. Volumes become real under those nimble little hands.
Gather natural items like leaves or bark. These organic textures offer an interesting contrast with manufactured materials. Nature is an endless source of new sensations.
Let the child handle things freely before gluing. Touch is the first learning tool at this age. Exploring without pressure helps them take in each new material they discover.
🎨 Simple painting techniques for endless fun
Beyond modelling, painting offers an endless playground for visual experiments for children aged 3 to 6.
🖐️ Painting with fingers and unexpected objects
Use handprints to create animals. A thumb becomes a caterpillar. A palm becomes a lion. This technique gets rid of the frustration of using a brush.
Try sponges or corks. These everyday objects produce repeating patterns. The result is very graphic and fun. It’s perfect for little hands.
Roll inked marbles around inside a cardboard lid. The abstract result looks like a masterpiece. Children love watching the trails cross over each other.
| Tool | Visual effect | Difficulty |
|---|---|---|
| Sponge | Textures | Very easy |
| Cork | Circles | Easy |
| Fork | Streaks | Easy |
| Marbles | Wild lines | Medium |
🖍️ Drawing with chalk or magic markers
Offer chalk on black or dark paper. The instant contrast fascinates children. It’s a real change from the usual white paper. The visual effect is immediate.
Decorate pebbles with acrylic paint markers. These solid surfaces turn plain stones into treasures. The colours stay bright and dry very quickly.
Try blow painting with a straw. By directing the air, the child creates explosive shapes. These blots then become funny colourful monsters. It’s like magic.
Be sure to protect the work area. Blow painting can sometimes get a little messy. An old newspaper under the sheet does the job perfectly.
🧊 Colourful experiments with ice and water
Freeze coloured water in ice-cube trays. As they melt on the paper, they leave beautiful trails. The sensory experience is refreshing and very original.
Wet a sheet of paper slightly before painting. The colours blend on their own across the surface. This creates natural, surprising gradients with no effort at all.
Use watercolour to play with transparency. Layering light coats teaches the child patience. It’s a gentle way to get used to handling brushes.
Watch together how the primary colours blend. It’s a first fun lesson in science. You learn while having fun with easy creative activities for children aged 3 to 6.
♻️ Giving everyday objects a second life
Creativity doesn’t need a huge budget, because your recycling bins are full of untapped treasures.
📦 Turning cardboard into extraordinary toys
Build a space rocket. A few pieces of tape and some paint are all you need for lift-off. Cardboard is a sturdy, versatile material. It’s perfect for little explorers.
Make masks from paper plates. Cut out the eyes and let the child decorate their favourite character. It’s simple and the result is always one of a kind. You have fun without making life complicated.
Create a marble run from paper rolls. Stick them onto a wall with tape. It’s a great way to use up vertical space.
For your next easy creative activities for children aged 3 to 6, carefully save:
- Cereal boxes
- Kitchen-roll tubes
- Milk cartons
- Disposable plates
🪨 Creating characters from sticks and pebbles
Customise lolly sticks to make bookmarks. Add googly eyes or wool hair to bring them to life. These little reading companions are adorable. You can even paint them.
Paint pebbles to form a family of ladybirds. These little objects are perfect for decorating flower pots. It’s an activity that brings colour to the garden or balcony.
Use odd buttons for the details on the faces. Recycling these small pieces builds gluing precision. Fine motor skills get a workout without the child even noticing. Clever, isn’t it?
Invent names for each character you make. This sparks the imagination beyond simple crafting. A stone suddenly becomes a hero with an incredible story to tell.
🎭 Making puppets for the evening show
Save odd socks to make puppets. A bit of glue and two buttons are enough to create a chatty monster. It’s amazing how expressive an old sock can become with a piece of cardboard for the mouth.
Turn wooden spoons into storybook characters. It’s a quick activity that lets you play right away. Add a bit of wool for the hair and you’re done.
Set up a shadow theatre with a shoebox. A sheet of white paper and a lamp are all the show needs. Shadow puppets always fascinate little ones — a magical moment guaranteed.
Encourage the child to invent a little play. The craft then becomes the backdrop for spoken storytelling. The show can begin — settle comfortably on the sofa to admire the result.
🎉 Celebrating the seasons and holidays as a family
The calendar is a constant source of inspiration for refreshing your creative projects all year round.
🐰 Spring crafts and Easter decorations
Make paper flowers to celebrate the return of the sun. Use muffin cases for the petals. It’s a simple method for a full, rounded result. The bright colours instantly brighten up the home.
Get ready for the egg hunt with homemade baskets. A decorated yoghurt pot makes a perfect holder for the chocolates. Children love personalising their future sweet haul.
Make bees from rolls painted yellow. Add tracing-paper wings for lightness. This little insect comes to life in just a few minutes.
These shared moments nurture cultural wellbeing and the parent-child bond. It’s a chance to create lasting memories together.
🍂 Autumn activities with treasures from nature
Make leaf prints with gouache. The tree veins create natural patterns of great delicacy. Each kind of tree leaves a unique design on the paper.
Model a hedgehog from salt dough. Use twigs gathered in the woods for the spines. This rough texture contrasts with the softness of the dough.
Put together chestnuts and acorns to make little figures. A bit of modelling dough works as the joint between the pieces. You end up with a little woodland family.
Use the walk to collect the materials. The activity begins the moment you head outside. Gathering treasures is already an adventure in itself.
🎄 Getting ready for Christmas with ornaments and homemade cards
Make unique Christmas baubles from salt dough. Cut out stars with a cookie cutter and pierce a hole for the ribbon. They’ll proudly decorate the tree branches this year.
Create greetings cards with glitter. A bit of glued cotton wool perfectly mimics a Santa beard. It’s a touch that always melts grandparents’ hearts.
Make a garland of coloured paper rings. It’s an excellent cutting and gluing exercise done in a series. The chain grows longer with everyone’s efforts.
The end-of-year holidays are the perfect time to give away creations made with love.
⚡ Quick activities and tips to encourage independence
To finish, let’s see how to fit these moments of creating into a busy daily routine while giving the child more responsibility.
⏱️ Express creative missions in under 15 minutes
Offer themed colouring for transition moments. It’s an effective way to calm the buzz before a meal. Choose simple designs with large areas.
Teach them to fold paper planes or boats. Paper folding is a portable activity that needs no supplies. It’s perfect for keeping busy anywhere without taking up space.
Start a drawing and ask the child to finish it. This collaborative challenge sparks imagination without the pressure of a blank page. You’ll see, their ideas are often surprising.
Always keep a notebook and felt-tips in your bag. It’s your secret weapon against boredom in waiting rooms. That way you avoid reaching for the phone too quickly.
📊 Adapting projects to the child’s age
Simplify the cutting for little ones aged 3. Prepare the shapes in advance so they can focus on the gluing. This avoids needless frustration with scissors.
Add precision challenges for children aged 6. They love minute details and complex decorations. It’s the ideal time to try out acrylic paint pens.
Offer different difficulty levels for the same activity. This lets siblings create together without frustration. Each one moves along at their own pace on their own project.
Watch your child’s motor progress. Adjust your expectations so that enjoyment stays the main driver of the project. The key is for them to feel proud of their hands.
🌟 Encouraging free creativity without screens
Let the child pick their own colour combinations. Don’t aim for realism — instead, encourage their personal, spontaneous expression. A blue polar bear, why not?
Value the process over the finished result. What matters is the joy of handling materials and trying out new ideas. You learn by touching and experimenting.
Use picture books to feed their visual inspiration. Children’s illustrations are wonderful starting points for invention. It’s a great alternative to online videos.
Switch off the television during the session. Silence or soft music helps full creative immersion. Easy creative activities for children aged 3 to 6 often go hand in hand with calm.
Setting up a dedicated corner and using recycled materials lets you spark sensory awareness without stress. These easy creative activities for children aged 3 to 6 turn every afternoon into a memorable adventure. Get out the paint and the cardboard quickly, because these moments of togetherness fly by. Creating together means building lasting memories.
❓ FAQ
🧰 What are the must-have tools to start crafting with a little one?
To begin with peace of mind, I’d suggest always keeping some safe basics within reach. A pair of round-tipped scissors, a solvent-free glue stick and sheets of coloured drawing paper make the ideal foundation. These tools let your child handle materials safely and develop fine motor skills with ease.
For painting, go for liquid gouache or finger paint, ideally water-washable to avoid little dramas on clothes. Don’t forget to keep a few toilet-roll tubes and cardboard boxes: these are free treasures that offer endless building possibilities for budding little architects.
🧹 How can I limit stains and mess during a painting session?
The secret to keeping a smile is planning ahead! I’d advise always covering your table with an oilcloth or old newspapers. A large plastic tray is also a great trick for containing paint spills. To protect clothes, an old adult T-shirt makes a perfect, very cheap apron.
Always keep a damp sponge or wipes right at hand to deal quickly with a runaway fingerprint. Finally, setting up a little playful tidy-up ritual at the end of the session helps the child understand that cleaning and sorting the brushes is also part of the joy of creating.
🧽 Are there tips for easily cleaning felt-tip or paint marks?
If, despite your precautions, a stain lands on clothing, white vinegar is your best ally. Soak a cloth, rub gently, then wash in lukewarm water. For felt-tip marks on wooden furniture, a simple cloth with a little rubbing alcohol often works wonders — but remember to wipe with a dry cloth straight afterwards.
On walls, a damp sponge with a little soapy water is usually enough for gouache. If your little artist has used pastels, a melamine sponge is a very effective solution. The ultimate tip is to choose water-soluble felt-tips and non-toxic paints, which makes clean-up time so much easier.
🎨 What simple activities can I offer to keep a child aged 3 to 6 busy?
The choice is wide and doesn’t always need much preparation. You can offer painting with everyday objects like corks or sponges to create fun patterns. Handprints turned into animals (a thumb for a caterpillar, a palm for a lion) are always a big hit and avoid the frustration of handling a brush.
To vary the fun, think about sensory activities like making homemade modelling dough or painting with coloured ice cubes. If you’re short on time, sticking stickers or drawing with chalk on the pavement are sure bets that let the child express their creativity freely.
🌟 How can I encourage my child’s independence in their craft corner?
The ideal is to set up a space with child-sized furniture, where they can settle in on their own. Use clear bins or low shelves so the supplies are visible and reachable without your help. If the child can fetch their own sheets and pencils, they’ll feel entrusted with a mission and build their self-confidence.
I’d also suggest celebrating their creations by setting up a little display area, like a cork board or a string with clothes pegs. This turns their work into a real art gallery and encourages them to keep experimenting. Independence also means letting them choose their colours, even if the sun ends up blue and the grass pink!