
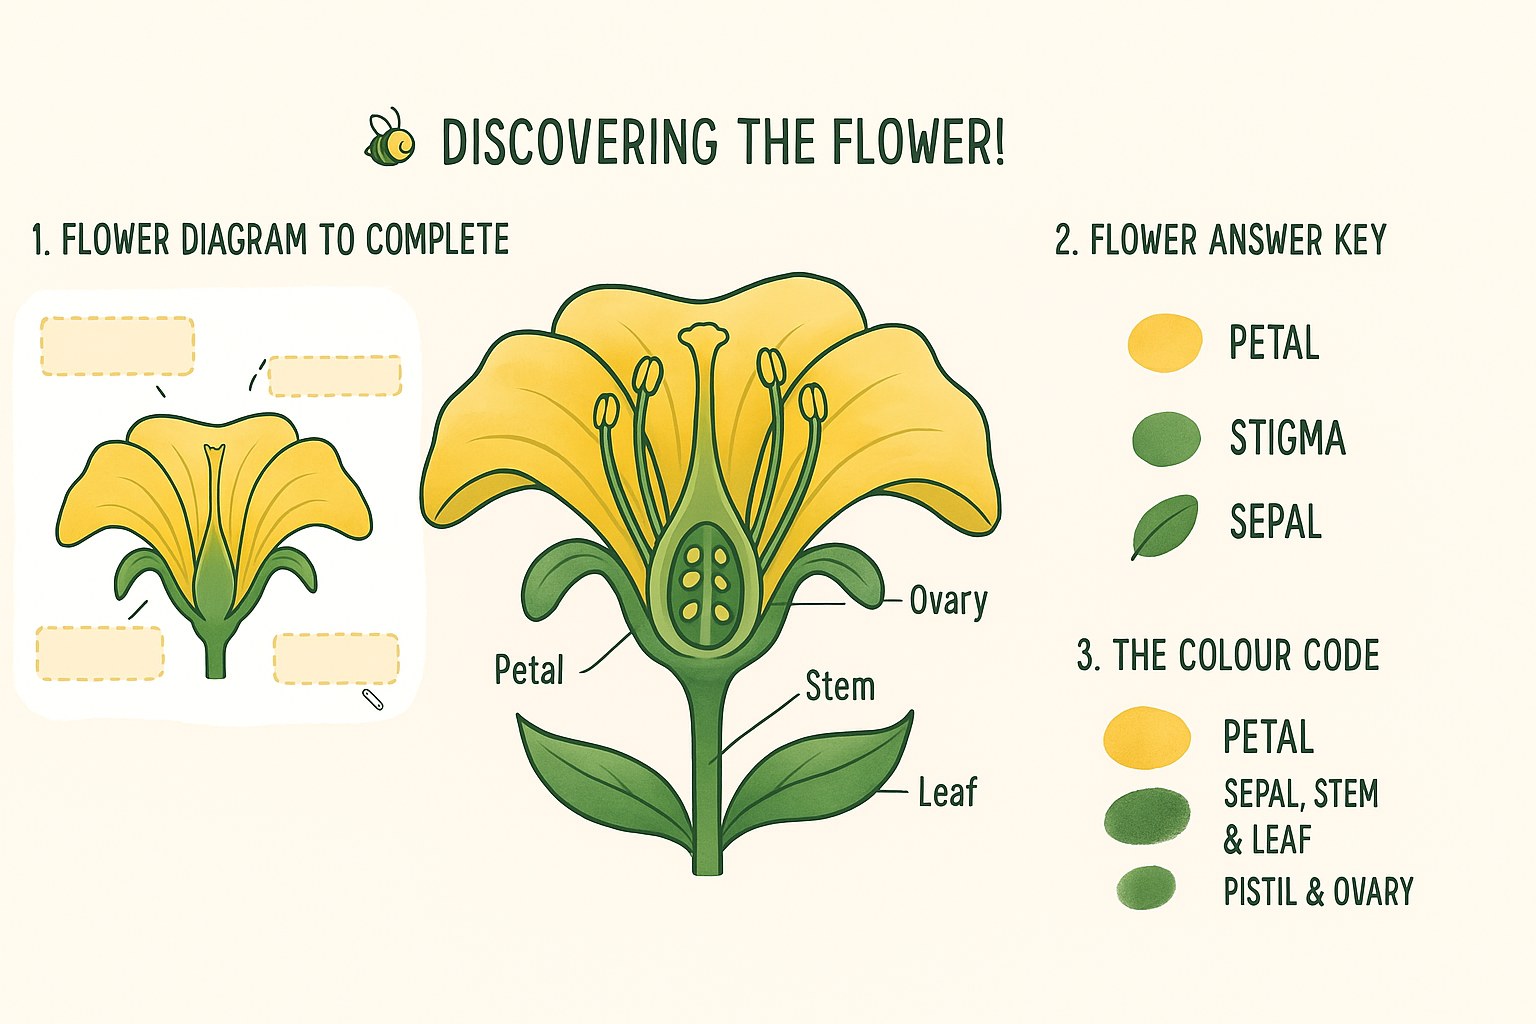
Explaining botany to children without a visual aid quickly turns into a headache for parents. This guide offers a printable flower diagram with labels to place to turn that lesson into an effective memory game. You’ll find clear teaching tools, including a completed answer key and colouring tips, so that the pistil and the stamens hold no more secrets for your little explorers. 🌸
- Printable flower diagram: our free worksheets
- The parts of the flower explained simply
- What do all these organs actually do?
- The amazing journey from flower to fruit
- Printing your teaching worksheet successfully
- Fun learning with botany
🌸 Printable flower diagram: our free worksheets
Now that you understand why observing nature matters, here are our ready-to-use visual aids for your teaching sessions.
🔍 The cross-section to understand everything
This diagram shows the inside of the flower. You can clearly see how the hidden organs are arranged. It’s a cross-section view.
The drawing details the receptacle and the floral parts. You’ll find a complete diagram of a typical flower. Everything is neatly ordered.
The lines stay clean and simple. It’s perfect for young pupils.
🏷️ A blank worksheet with labels to place
Here’s a very hands-on cut-out activity. Children have to stick each label in its right place. This helps them memorise the botany terms. The sheet also lets them write the names.
You can adjust the difficulty easily. Just remove the trickiest words depending on the child’s age.
The child takes an active part. It’s fun and effective.

✅ The answer key for busy parents
The completed version allows for instant correction. Parents save loads of time with this template. All the exact terms are already there.
The diagram points out the key parts. In particular, you’ll find:
- Pistil
- Stamens
- Petals
- Sepals
- Floral receptacle
This document works as a reference. It checks what’s been learned quickly.
🎨 A clever colour code for each organ
Using standard colours helps a lot. Use green for the sepals and yellow for the pollen. Visual memory loves these little markers.
Keep protection and reproduction clearly apart. Cool shades dress the outer wrapping. Bright colours highlight the central reproductive organs.
The brain remembers contrasts. Colouring becomes a teaching act.
🌷 The parts of the flower explained simply
Now that you have the worksheets in hand, let’s look at the role of each organ so you can explain them better to children.

🛡️ Petals and sepals for protection
Petals attract pollinators with their bright colours. Those shades aren’t there by chance. They act as a strong visual signal for insects.
Sepals do an essential protective job. They form the calyx that wraps around the bud. It’s an effective shield against outside attacks.
Together, they protect the fragile heart. The flower secures its survival this way.
♂️ Stamens and pollen for the male part
The stamen is the plant’s male organ. It’s made up of the filament and the anther. This is exactly where the pollen is made.
The pollen sacs release thousands of tiny grains. These particles travel from one flower to another. These grains are essential for the future fertilisation.
Look at the yellow powder on your fingers. It’s the seed of plant life.
♀️ Pistil and ovary for the female part
The pistil sits in the centre of the flower. The stigma, at the top, is often sticky. It catches the pollen that passes by.
The style links this top to the ovary. The ovary holds the ovules safely tucked away.
The flower’s job is to protect the ovule inside the ovary and to attract pollinators.
It’s the cradle of the future seeds. Everything happens in this central part.
🌼 Complete or incomplete flowers: the difference
The variety of flowers is surprising. Some don’t have all the organs listed. We then call them incomplete or unisexual flowers. This is the case for many kinds of trees. A printable flower diagram helps you picture these differences.
Hermaphrodite flowers are the most common. They carry both the male and the female parts. This is very usual in our gardens.
Nature is full of variations. Each species has its own strategy.
🤔 What do all these organs actually do?
Beyond the pure anatomy, every piece of the floral puzzle carries out a precise biological mission for the survival of the species.
🐝 Charming insects with bright colours
The beauty of flowers ensures their survival. Bright colours and scents draw the bees in. It’s a true natural charm offensive for the plant.
The nectar acts as a sweet reward. The insect comes to drink this delicious liquid. In exchange, it accidentally rubs against the pollen. It’s a win-win deal between the flower and the animal.
Without this trick, no reproduction. Beauty is a powerful weapon.
🌱 Making the future seeds in the ovary
After fertilisation, the change begins. The ovule slowly starts to swell. It will become a seed that can sprout later on.
The ovary walls offer sturdy protection. They thicken to surround the future embryo. It’s an effective biological armour against outside knocks.
| Organ | What it becomes after fertilisation | Final role |
|---|---|---|
| Ovule | Seed | Reproduction |
| Ovary | Fruit | Protecting the embryo |
| Petals | Fall off | Attraction done |
| Sepals | Protect the base | Supporting the fruit |
🍃 Protecting the bud with the sepals
The sepals form a physical barrier. They keep the bud nice and warm. They mainly stop the rain from spoiling everything too soon.
Keeping the inside moist is vital. The fragile tissues must never dry out. The flower then opens in a very gradual and safe way.
Once the flower has opened, the guard steps aside. The sepals often stay at the base. A printable flower diagram helps you spot these little green protectors clearly.
🍎 The amazing journey from flower to fruit
This well-oiled machine leads to a spectacular event: the birth of a fruit from a simple bloom.
🐝 Pollination, or the work of the bees
The pollen is carried by the wind or by animals. This is a crucial stage in the cycle. Without this movement, there is no life.
The pollen grain then lands on the stigma. This contact triggers an instant chemical reaction. The flower recognises the right partner. It’s the start of a fascinating microscopic adventure.
Bees are the main messengers. They connect the flowers to one another.
🌰 Fertilisation and the swelling of the ovary
The pollen tube travels gently down towards the ovary. The pollen grain digs its way through. At last it will meet the hidden ovule.
The faded flower then begins its physical change. The petals lose their shine and drop off. The ovary then starts to swell noticeably. It slowly turns into a juicy fruit.
The flower disappears to make room. The fruit becomes the new guardian.
🌱 The arrival of seeds for the future
The seeds scatter. They fall to the ground or get carried off. The wind or the birds help out.
The plant’s life cycle is complete. A new shoot will soon push up from the earth. The loop is finally closed.
Each seed carries the hope of a forest. Nature never stops creating.
🖨️ Printing your teaching worksheet successfully
To bring these explanations to life, it’s time to take action by printing out your worksheets.
📥 Downloading the file in high definition
Always go for the PDF format to guarantee top quality. This stops you from getting blurry or pixelated images. The lines of the diagram then stay nice and crisp for the child.
Check the resolution of the document before you hit print. A good-quality file guarantees a really easy read.
Choose colour or black and white. That will mostly depend on your ink budget.
🖨️ Setting up the printer for A4 format
Adjust the margins on your computer before confirming. You really must not cut off the important labels. Simply use the “fit to page” option in your settings.
Go for single-sided printing. It’s far handier for the cut-out activities to come.
Check your paper tray. Hit print with full confidence.
♻️ Laminating the document to reuse it
Use erasable markers straight on the protective plastic. You can then redo the activity many times without a worry. It’s a clever and very budget-friendly trick for everyday use.
This protects the sheet effectively from little hands. Thick paper such as cartridge paper holds up even longer.
Your worksheet then becomes a lasting tool. It will easily serve for several school years in a row.
🌿 Fun learning with botany
Learning doesn’t stop at the paper; here’s how to turn botany into a real playground.
🧠 The organ-name memory game
You make a little homemade flashcard system. Just match each precise term to its biological job. It’s the perfect trick to learn without even noticing.
Then launch a timed challenge to place the labels. Children love this friendly little competition between them.
Repeat the game often. The names will come naturally.
👀 Watching real flowers in the neighbourhood
You set up a field trip armed with a magnifying glass. Spot the organs on real flowers. Then compare them with your printable flower diagram.
Watching the pollen and the stigma up close is fascinating. Reality is often far more complex than a drawing.
Admire this schematic representation of the flower. It helps a lot.
🎨 Colouring by biological function
Use logical colours for educational colouring. Choose blue for protection and red for action. This creates really strong mental anchors.
Simply explain the logic behind each chosen shade. The child then understands much better what they’re drawing on their sheet.
“A floral diagram is a schematic representation of the flower that describes how its different parts are arranged.”
Thanks to this printable flower diagram, your little botanists will memorise the role of the pistil and the stamens in the blink of an eye. Download your worksheets quickly to turn your next walk into a fascinating exploration. Give them the keys to understanding the secrets of nature right now!
❓ FAQ
🌸 What are the main parts of a flower found on a diagram for children?
On a classic teaching diagram, you usually spot the protective and reproductive organs. You’ll find the colourful petals, the green sepals at the base, plus the male parts called stamens and the central female part called the pistil.
For the more curious, the diagram also details the anther (which holds the pollen) and the ovary in the heart of the flower, where the future ovules are hidden. It’s an excellent base for understanding how nature works while having fun.
♀️ What exactly is the pistil and what is its role?
The pistil is the female organ of the flower, often set right in the centre to keep it protected. It’s made up of the stigma at the top, which catches the pollen, a tube called the style, and an ovary at its base that shelters the ovules.
Its role is essential: this is where the magic happens after pollination. Once the ovule is fertilised by the pollen, the ovary slowly changes to become a fruit, while the ovules become the future seeds.
♂️ What are stamens and pollen for in plant reproduction?
The stamens are the male part of the flower. Each stamen has a filament and an anther, a kind of little sac that produces and stores the grains of pollen. These tiny yellow specks are essential because they hold the plant’s male cells.
The pollen has to travel from one flower to another, often thanks to bees’ legs or to the wind, to reach the pistil. It’s this journey, called pollination, that then lets the plant make new seeds.
🌈 Why do petals have such bright colours in the drawings?
The petals form the corolla, and their brightness isn’t only there to look pretty in our vases. Their colours and scents act as a visual and smell signal to attract pollinators, such as butterflies or bees.
By coming to fetch the sweet nectar deep inside the flower, these insects rub against the stamens and carry the pollen without even noticing. So the petals are real tools of charm in the service of the species’ survival.
📊 What is a floral diagram and why is it useful?
A floral diagram is a schematic representation of a flower seen from above, as if you’d made a cross-section. It shows the precise arrangement of the floral parts (sepals, petals, stamens and pistil) and how they’re set out in rings.
It’s a very handy tool for budding little botanists because it simplifies the flower’s structure. It lets you see whether the parts are joined or free, and identify the family you’re observing more easily.
🌿 How do you use a printable worksheet to teach children botany?
An activity sheet with a diagram to complete is ideal for fixing knowledge in place. The child can match labels to place (pistil, stamen, sepal and so on) to the different parts of the drawing, which boosts their visual memory and fine motor skills.
You can also offer a colouring activity with a colour code: for example, green for the protective sepals and yellow for the pollen. It’s a fun, hands-on introduction that turns a science lesson into a creative moment to share.
